The majority of saxatile and alpine plants require some sort of winter stratification – time when the seed is both wet and cold – to germinate. The same is true of many other perennials. The few exceptions include most grasses, fiber plants (yucca and friends), most cacti, and some, but not all, asters. Those can be sown in spring, in a greenhouse, windowsill, or under lights at their preferred temperatures without pre-treatment. As an exception to an exception, the mountain ball cactus (Pediocactus) needs stratification and thrives being treated like a winter-sown alpine. Most production nurseries, and some hard-core gardeners, do their cold stratification in a refrigerator either as an entire seed tray or as seed in sand or on a wet paper towel in a baggie. This gives you great control but requires perfect timing: once that seed’s little internal clock has counted its needed chilling hours, it germinates in the fridge; and you’d better notice what is happening in that bag next to your butter drawer or the seedlings will etiolate and die. Outdoor winter sowing allows seed to get enough – or more than enough – of their chilling needs and to germinate at the ideal spring temperatures it prefers.
Gwen Moore once told me that a New Year's Day seed sowing is a nice tradition. I can see why. On January first, you can sow your own collected seed and will have received the earliest purchased or exchanged seed. Many seed exchange seeds will arrive during January and even February, so it's good to get them sown right away so they get enough chilling time. I once sowed everything on February first, and in my zone 6a climate an early spring that year deprived most of that seed of adequate chilling, so I see that date as a good rule-of-thumb cutoff. This assumes the average longest chilling need is about three months.
Soil
I suggest making one good soil mix and sticking with it, having suffered from “media mania” myself for years, trying to create and optimize multiple mixes like a summer-deprived, shut-in mad scientist. Just believe me that there is little benefit to making many different mixes. Find a high quality bagged mix, usually peat-based, like Pro-mix, Sunshine, Black Gold, and the like (in American markets.) I’ve tried to eliminate peat from my nursery diet, but coconut coir has been disappointing for rock garden plants. Some regions have access to fir bark or other tree composts that work very well. Whatever you do, don’t buy the cheap hardware store or Miracle-Gro stuff; it is often either loaded with actual dirt or is mostly unfinished wood fiber compost that will truly disagree with your rock garden seedlings in an ugly way. Then, loosen that mix with something to provide radical drainage for alpine and rock plants. The goal is simply to maintain some air in the mix when it gets wet. One classic example would be one part soilless mix to one part perlite. I’ve been using scoria, or 1/4 inch (6 mm) sized “lava rock” in place of perlite and love it; pumice is also excellent. I know many successful NARGS friends who do one part coarse sand, one part peat, and one part perlite. My personal favorite, which I’m sticking with for my foreseeable future, is what I call “the trinity”: equal parts Promix HP soilless mix, scoria (or perlite), and expanded shale. The expanded shale holds onto nutrition and water for plants that I like to allow to dry out. In place of it, you can use Turface, (U.S. markets), Seramis (Europe), or other calcined clay products that show up for sale as structural concrete conditioner, oil absorbent, or hydroponic medium.
Sow
Most rock gardeners sow seeds into two- or three-inch (5 or 7.6 cm) pots in their 32- or 18-pot trays. Use a pot size and make that you have an abundance of, even if it’s to use cups with holes poked through the bottom. Fill those pots 1/2 inch (1 cm) from the rim and gently tamp the surface down with a bent finger or bottom of another pot to create an even soil-mix surface. Set your seed on that tamped surface by whatever means is most comfortable to you. Use tweezers if you are fastidious or, my favorite, gently shake or slide them off of a curved slip of paper. This may be the top flap of the envelope the seed came in. Lay down enough seed so that if all of them were to germinate they won’t crowd one another too much to be separable. The amount of seed you use is a judgment call; don’t be too scared. Just do it and see what works. Here is where you pay attention to seed size. The general rule of thumb is to bury seeds three to four times their size in depth. For super fine seeds like poppies and drabas, that means not buried at all. For the rest, that means either gently sprinkling a pinch of soil on top of the seeds, or, even better, sifting that thin layer on them with a strainer, screen, or colander. This ensures that the soil in direct contact is the finest texture and not lumpy with those soil additives you so wisely used.
Grit
Lastly, the hallmark of a rock gardener growing from seed: gravel topdressing. Find a fine gravel or “grit”, anywhere between 1/8 to 1/3 inch (3 to 10mm) in size. It may be available as a fine landscape gravel, road grit for icy roads, aquarium gravel, unfortified chicken grit, or stolen from a local ant colony like we often do here in the West. It’s always been my struggle to find that happy medium size, about kitty-litter size, so I’ve finally wound up just using what appears between two seed-cleaning screens when I sift decomposed granite, a very common byproduct of making crushed gravel around here. Apply just enough of this grit to cover the soil mix. Too much and those draba seeds won’t be able to get through with their thread-thin necks. The topdressing will help keep snow, rain, or the watering can from splashing your precious seeds away as well as ameliorate moisture fluctuations.
Soak
Now you have sown some seed. Time to soak it and chill it outside. I used to use a very gentle sprinkling watering can, but those have gotten harder to find, so I started letting trays of new seed pots soak in a shallow tray of water. I recently found out that this is what everyone sensible has been doing forever. If it is truly cold outside, below freezing most of the day, it is wise to let those new pots be wet and unfrozen, indoors or in your garage, for about a day before you stick them outside. This is because the seed must be moist and imbibe (swell with water) before it starts counting the cold hours, and it may not be able to absorb that water if it’s all instantly frozen solid. My heart feels like it's a good omen when I walk out of the garage with a wet tray while it is actively snowing. I leave footsteps to my seed pot area and the snow will gently cover that new tray and slowly coax it into the temperatures of winter.
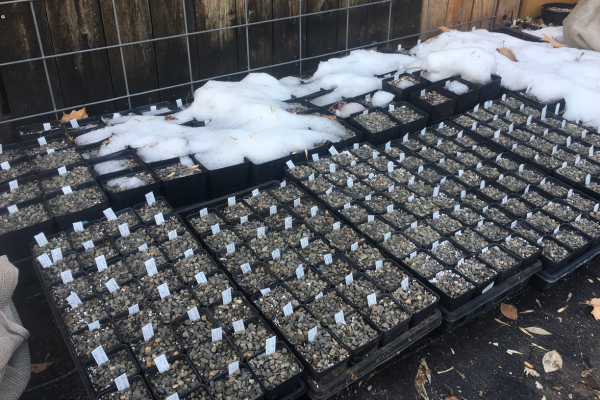
Site
Now, to site your winter-sown alpine seed, you must accept and understand that it is okay for them to become ice cubes in their little trays or lay buried under a snowdrift. This is ideal. Most folks have a spot north of their house or garage that doesn't get winter sun, where the snow lingers the longest. Just occasionally someone will successfully use an eastern exposure, but any sunnier than that and there is a strong risk of freeze-drying those trays on a sunny winter day, or worse yet, drying them out in spring or summer and killing the seedlings.
The best seed tray spots are along paths where you will see them: near garages, porches, patios, potting benches, and hose spigots. Be sure to put your pots in trays to keep them from tipping over like dominoes. It also makes them more easily seen and watered and not just tripped on. Tipping seed pots make a sound even more cringe-worthy than that sound we all know: an alpine plant tipping its gravel on the sound-board of your cardboard box at a plant sale, just like ball bearings lost from the machine in the final turn of your smooth plant-grabbing moment.
If your trays are set on the ground, don't set them on open dirt, but on pavers, concrete, bricks, gravel, weed fabric, any polyester fabric, or even tight hardware-cloth mesh, to keep earthworms, voles, and mice out, as well as to keep roots in. I've used the cheap 70% shade cloth from the hardware store, too. It's good for the trays to get warmth by contact with the soil but not the other things that come with it. Most weak barriers allow roots to grow through the pots and into the soil, ruining them when their taproots are snapped as you lift their pot. This is something to keep in mind if you opt for the otherwise excellent sand-bottomed idea. I look forward to trying polyester felt, which also acts as a capillary mat but is too tight for roots to penetrate. Some folks elevate their trays on wire mesh tables, but this requires the most constant babysitting because of a perched water table and the greater temperature fluctuations off the ground. If things look nicer to you in a box, go ahead and make a wood frame around your little seed baby area. It helps me decrease the number of times I catch a tray corner with my foot and send it flinging into the air to mix with my flying curses.
Also, consider protection from above. An overflowing gutter or gutterless eave will wash your seed pots out biblically. I've had that one thanks to a clogged gutter. North of a house or fence is pretty dang safe, but if you choose the north side of an evergreen, you may want to cover the tops of your seed pots with screen, or again, cheap and lazy shade cloth to keep tree droppings out. You can stretch it to a frame and even put it on a hinge if you are fancy like that. It will be easy to lift off and check on seedlings as they emerge. Most importantly, it's good to let light and natural precipitation penetrate while keeping falling leaves from smothering something precious.
I'd also encourage placing your seed trays somewhere you regularly go with a water hose, since the snow melts away, the days can be dry enough as early as March in Colorado, and we have to start watering to keep the pots moist as all the babies emerge. I usually see first cotyledons in February on my eriogonums or drabas. Now, just keep your trays watered. I find myself watering my seed area every other day most of the growing season to keep it from ever drying out, less in spring and fall. If June rolls around and nothing else has come up and you are not growing-on seedlings in the same place, you can conceivably let the seed zone get dry in summer and resume watering in fall. On the other hand, if your growing area is bright enough in summer, but either shade-clothed or still within shadow, it's a good spot to grow your tiny plants in tiny pots in the summer. Because, as you know, a tiny pot in the full summer sun cooks in mere hours.
Care
Give yourself enough tray space for twice what you think you want, because it's wise to keep ungerminated pots at least one more year for double-dormant or super-picky germinators. You can also use that space for pots of separated seedlings, in their own pots. Keep nearby leaf accumulation down, for this harbors slugs and earwigs which use their dark magic to make tiny things disappear at night before you've even seen them. Trays themselves are cool wet hiding places for slugs, so I liberally use diatomaceous earth, beer traps, soy sauce traps, and Bug-Getta Plus (a Carbaryl-based chemical bait) as a last resort to slay my enemies overnight in a desperate time. Not amusingly, hand-hunting slugs at about 11 pm has been the most effective method at keeping them in check for me. It’s fun the first and second nights, but your fourteenth night in a month gets old. Try to limit how much diatomaceous earth dust you use in the pots themselves as it essentially becomes clay when wet, and you don’t want that to clog your soil mix. I dust or blow it under and in between trays. Over the years, I've found that a preference for organic pesticides has led to a population of black widow spiders that really love to live in the divided trays. They ride around with the plants and I have even had them harmlessly crawl over my hands when I displaced them. I try to miss them with my fingers to avoid friendly fire; widows are just toxic enough to kill a small dog. I let them be because they are the only ally I have against the positively demonic earwigs.
There is truly nothing comparable to watching a full new seed pot germinate. It feels powerful to have, in a tiny pot, what can cover a whole banquet table when they all grow up into mature plants. Let seedlings develop at least their first leaf before fertilizing. Alpines and rock plants generally prosper with a half solution of any fertilizer, and there is still debate as to whether they prefer organic or chemical fertilizers.
Separating all the babies from a seed pot into their own containers is called pricking (or, pricking out), and there is a window in which to do this starting when they are large enough to handle and safely move and ending when they become so entangled by root or stem that separating them means destroying them irreparably. Overgrown seed-pots can also become etiolated from all those plants competing, leaving you with leggy, sad, pricklings.
Do not despair when pots don’t germinate at all. Just check that you didn’t make a mistake and then perhaps blame the seed source to relieve your conscience. If you are growing seed from all over the world, or many sources, having half come up is good, since transit, storage, identity, and even poor seed health are more likely with diverse sources. You’ll get a clear benchmark of a good crop when you grow your own garden-fresh seed of an easy species. Relish that, celebrate the win, and be glad your friends will quit bugging you about giving them some of that robust plant they’ve pestered you for.
Don’t expect all of your seed to become garden plants. Just try, learn, enjoy what you get, and repeat. Some, like gentians, are very slow, taking several years to fill a two-inch (6cm) pot. Others, like erigeron, can bloom their first year from seed.
Perhaps even better than seamlessly providing enough chilling hours for seed, the great advantage to home winter-sowing outdoors is that seedlings germinate at the ideal time in spring to take advantage of their favorite temperatures and weather (be it early or late) for best development at their most tender stage in life. To make life easier, you can even include your warm-blooded plants' seed and those that don't require stratification in your seed-pot zone. They will simply come up later in the spring or summer.
The practice of winter-sowing will enrich you with plant strains passively improved for your climate and garden, and free you from the oppressive constraints of the same boring five stonecrops and five thymes from the big box store. It is an investment into years of pleasure watching your babies grow, a satisfaction growing something yourself from seed to seed, and a passport to enjoying the most cutting-edge and newly-discovered exotic gems that may never be available as plants. For me, winter sowing is a winter ritual and sanity defender. I even installed a used wood stove in my shop almost specifically to cozy up those midwinter days of cleaning seed and sowing it. It also turns out wood stove-top popcorn is genuinely better.
 in the north shadow of a fence where snow accumulates.")