I wanted to dismantle the wall because I had many questions about how it held itself together and nourished its plants. However, I knew that plants can send their roots through tufa and I’d harm them if I moved the stones. I couldn’t hurt the plants! So, I decided to contact the rock gardeners at RHS Wisley after returning home for answers to my questions.
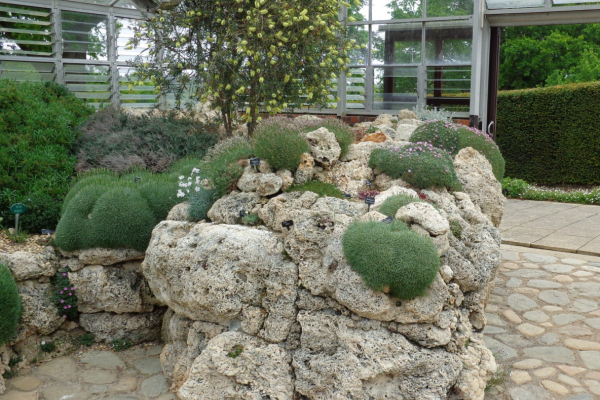
Working through the RHS Gardening Advice service, I was able to communicate with the Wisley alpine team. I focused my questions on the north-facing tufa wall on the outside of the Landscape Alpine House because it was definitely subjected to frosts and, as you can see in the photo above, it had no discernible batter or mortar. The wall looked like it would lose stones the first time a child, or even a squirrel, climbed it.
Through a series of emails, I learned that the uncoursed tufa wall was dry fit with no mortar. The masons cut the tufa with chisels and angle grinders with diamond blades (disks) and then “linking each rock so that each rock holds the ones around so they are a solid fit and then with the soil in behind it securing them in place.” They added that most of the stones required minimal shaping, so they had a large pile of tufa to select from. The wall’s face stones had been trimmed to fit together tighter than randomly shaped tufa would. When you cut tufa with a diamond blade, the cut surface looks obviously artificial, like the back side of travertine tile. I saw no cut surfaces or chisel marks on the Wisley tufa walls.
A dry stone wall relies on friction and varying degrees of mechanical interlock to hold the stones in place. Tufa’s rough surface increases friction while its light weight decreases the friction force. It appears that the Wisley masons shaped the stones to more strongly interlock than normal, building a wall that could survive the abuses of a public garden. You won’t see many granite dry stone walls built this way, but it’s economical with tufa because tufa is so easy to cut and shape with the right tools in skilled hands.
I was equally curious about what type of soil was inside the tufa wall. I was told that the Wisley tufa walls have “not much soil”. Instead, they contain mostly rubble and John Innes #2 (a soil-based potting medium) with added grit. I then asked how often they watered the wall. They answered that there was no internal irrigation system; the north-facing wall was watered every morning by hose and in the afternoon during extreme weather. In comparison, we water an east-facing, upstate New York tufa garden once a week in August because its tufa boulders sit on water-retentive clay that keeps the tufa and its plants hydrated. A fast-draining soil protects the Wisley walls from frost damage at the cost of frequent watering. Frost heave occurs when water in the soil freezes forming ice lenses. The ice lenses increase in size and are more destructive when water from below moves upwards due to capillary action and then freezes. Silt, clay, and fine sand soils support capillary action while coarse sand and washed gravel do not. In the summer, a more water-retentive soil provides a water reservoir that helps plants survive sporadic watering or an automatic irrigation failure. Can we build planted tufa walls in our colder climate that don’t have to be watered twice a day but also won’t be destroyed by frost heave?
In the remainder of this article, I’ll discuss several tufa projects that were inspired by the craftsmanship we saw at Wisley and other British gardens. All involved shaping tufa with a variety of tools but didn’t require the skills of a British stonemason. Most of these tufa structures contain soil and have withstood frequent frosts and freezes.
I’ll first describe two common tufa shaping operations that were used repeatedly in these projects: drilling and contact trimming.
Drilling
Tufa is normally drilled to create planting holes from one half to one inch (1.25 – 2.5 cm) in diameter and about two inches (5 cm) deep. I use masonry drill bits (see photo above) that have hard tungsten carbide cutting edges. In ascending order of less effort and faster penetration rate are low speed (to 650 rpm), high speed (to 3000 rpm) and hammer drills. Some tufa is difficult to drill with a low-speed drill. Any hammer drill will quickly penetrate tufa, but I’ve broken and ruined stones with a hammer drill that was too powerful.
Contact Trimming
Contact trimming is an iterative process where a smaller or less valuable stone is shaped to fit into a larger or more valuable stone. Contact trimming decreases the gap between two stones by removing the existing contact points. Cut marks are hidden inside the joint between the stones. Two contact trimmed tufa stones can appear to be a single stone if you avoid straight joints.
1) The first step in contact trimming is to place the two stones together and roughly mark with chalk the large areas where the two stones touch that have to be cut out. Then make a series of cuts every quarter inch (6 mm) up to the chalk line with an angle grinder or other tool. Then break off the tufa between the cuts with a flat screwdriver. I’ll often clean up the ragged tufa breaks between cuts by grinding to the chalk line with an angle grinder.
2) Fit the two stones back together. Use chalk to mark where they are touching. At first, it will be easy to see the contact point(s). But when you can’t, slide a thin strip of plastic (flexible plant labels work) along the gap between the stones until it catches on a contact point. Then pull out the plastic strip and stick it back in as a depth gauge. When it stops, hold it in place and pull the stone away. The end of the strip is at a contact point. Another method is to brush off the stones and then rub them together. You can sometimes see scrape marks or dust at the contact point(s).
3) Remove material at the marked contact points using one of the tools listed below. You’ll quickly learn how much to remove. Repeat steps two and three until you’re happy with the fit. If you aggressively remove material from the interior of the joint, you will reduce the number of iterations and save time.
I usually use a 4.5 inch (11 cm) angle grinder with a diamond blade for contact trimming because it’s the fastest. However, an angle grinder can disable or kill you in several ways. Read and follow the manufacturer’s instructions for all these tools and wear all the protective gear. A hammer and chisel or a brick hammer with soft tapping wrist swings will crush rather than chip the tufa and are surprisingly pleasant to use. However, it’s difficult to accurately aim the brick hammer blows, so the quality of the joint suffers. I use a chisel with a stronger blow to break off chips when I can’t hide the cut for a more natural surface. A Dremel rotary tool with a 9934 carbide carving bit quickly and accurately removes small amounts of tufa for the final contact trimming step. Other tools that I’ve used to cut tufa include a reciprocating saw with a carbide demolition blade and an oscillating multi-tool with a saw blade. Blades with carbide teeth cut faster than blades with carbide grit.
Project 1
The photo above is of a small, four-course, tufa wall built between two immovable limestone boulders. Concrete blocks set on bedrock provide a stable base. Stones were selected that roughly fit together, then each stone was contact trimmed to fit into another to form a concave curve, an arch on its side. The soil behind the wall presses on the arch, locking the stones together. The end stones were shaped to lock into facets of the limestone boulders. As new courses were added, each stone was contact trimmed to the stones below and to its right side so the soil wouldn’t wash out. Some upwards-facing openings were left for planting pockets. The arches didn’t require mortar, but I added two tablespoons of Type S mortar between stones (not visible from the front) to prevent them from being dislodged by woodchucks.
The close-up photo on the following page shows how the stones were shaped to interlock. The first two courses were shaped and mortared one course at a time. Then, I tried to save time by shaping all the stones in the top two courses and then mortaring them. This was a mistake. Rough tufa locks together slightly differently each time it’s assembled. Small misalignments added up so that the top course didn’t fit and had to be reshaped. As each course was built, I backfilled with soil and packed it down by ramming it with a board to avoid future settling of the three-foot (0.9 m) tall soil column.
At the bottom of the soil column, there are weep holes open to the air, a layer of washed quarter-inch (6.35 mm) stone, and drainage filter fabric to keep soil fines out of the washed stone. This drains excess water and prevents capillary action that could lead to frost heave that could damage the wall. The top of the soil column is open so that it can act as an expansion relief valve. All the projects in this article used the same soil column structure. The soil is mostly decomposed shale flakes that collect (7 tons/year) ten feet (3 m) from the plunge pool of a natural waterfall on our property. A good-sized brook flows through rather than over this material. I sift it through a half-inch (1.27 cm) screen and add compost, vermiculite, and peat moss to increase water retention and fertility. I can’t recommend this mix to others because the shale may break down into silt. A safer mix could use coarse sand in place of the shale. While the Wisley tufa walls had “not much soil,” I used lots of soil because the arch is a very strong structure that is only one stone thick. Drip irrigation emitters will water the top of the soil column once they are connected. Mary insists that we only water the north-facing wall by hose once a week, but I sneak in every few days to water new sax cuttings planted directly in the tufa. The three-year-old north-facing wall is planted with a variety of Primula, Hepatica, Haberlea, Asplenium scolopendrium, A. trichomanes, and others. An Abbott’s Pygmy hemlock grows in the upper center.
Project 2
The photo above looks like a typical tufa garden, but it actually involved considerable tufa shaping. The three tufa boulders around the circular pool were lowered two inches (5 cm) by cutting curved grooves into their bottoms so they slid down over the pool’s edge. I used a seven-inch (18 cm) angle grinder to make a series of concentric cuts about 3/8 inch (1 cm) apart. I then used a flat screwdriver to snap off the tufa between the cuts. I could have used a sharp beveled chisel to slowly carve out the grooves, but I always have more projects than time. There are excellent videos of stone carving on the web.
I wanted to add a fourth boulder above and behind the pool, but I was running out of matching sun-darkened tufa. I had two pieces that if joined would have sufficient visual mass. So I built a stable base, set the larger stone on the right side, and then contact trimmed the smaller stone on the left. After finishing the contact trimming, the two stones were tied together with a quarter inch (6.35 mm) stainless steel rod, epoxy, and mortar as shown in the top-view drawing above.
To join the two stones, I drilled a quarter-inch (6 mm) hole from the left face of the smaller stone, past the gap between the stones and four inches (10 cm) into the larger stone. A flexible quarter-inch (6 mm) drill bit easily deflects as it contacts the irregular surface of the larger stone, so use low pressure as the drill bit first makes contact with the larger stone and use a block of wood to support the drill bit so that it doesn’t skitter off axis. Otherwise, the less flexible solid rod will miss the hole. Then I blew out the drill dust with a flexible plastic air tube and cleaned it with a bottle brush. The metal rod (or a fiberglass rod) extends into each stone by two inches (5 cm). I used an angle grinder with a metal cutting blade to cut the rod to length, roughened the rod’s ends, and cut several notches at both ends for the epoxy to lock onto. I used a slow-setting, high-viscosity epoxy such as J-B Weld Original Cold-Weld so that I would have time to work and the epoxy wouldn't drain away into the porous tufa. To avoid getting epoxy on the outside of the left stone, work from inside the gap. First, I used a nail to work epoxy into both holes, then partially slid the rod into the gap, smeared epoxy onto the rod end in the gap, pushed the rod four inches (10 cm) into the larger stone, smeared epoxy onto the other rod end, and then pulled the rod out by two inches (5 cm). After the epoxy set, I spread Sakrete Type S Mortar mix on the inside of the tufa joint. I then ran a drip irrigation tube up through the gap, blocked the cracks between the tufa and the rear limestone with strips of landscape fabric, and filled the gap with free-draining soil.
Project 3
The 67 inch (170 cm) high tufa tower in the photo above appears to be a 30 inch (76 cm) long tufa boulder held above a much larger three-foot by three-foot (90 cm x 90 cm) tufa boulder. My first problem was that I didn’t have the larger boulder and one that size would cost thousands of dollars at the Ilion tufa quarry. I did have some 250-pound (113 kg) slabs of tufa that had cost $0.25/lb, and I decided to try to use contact trimming to fuse them into a hollow, soil-filled lower boulder.
My next problem was figuring out how I could repeatedly check for contact points, separate the stones, remove contact material and then reassemble the stones without breaking my back. Luckily, I had a nine-foot (2.7 m) high steel tripod which, fitted with an electric winch, gave me push-button control of the height of the stones. In the photo above, the tripod is lifting the first slab into position. Note, if you don’t have a tripod, you can use two stepladders with a beam across them and an inexpensive come-along for lifting stones. This type of work is dangerous if the cables break or boulders slip out of chains.
The first step was to mortar a four-inch (10 cm) schedule 40 steel pipe into a hole in the bedrock. I made the hole by drilling a circle of one inch (2.5 cm) holes and removing the rock between them. Then I built a solid 12 inch (30 cm) high stone base around the pipe so that the tufa slabs would be supported just below the ground level of the bed. After fitting the east-, south-, and west-facing slabs around the pipe, I tied the three slabs together with stainless steel rods as in the previous project. I had roughly contact trimmed the three large slabs and I still had some gaps between them. I cut small stones that would wedge between the gaps when placed from inside the boulder. These wedge stones couldn’t be pushed out by the soil, they created many upwardly facing planting pockets and a small amount of Type S mortar mix held them in place until the soil was added. In the Wisley photos, you can also see small stones fitted between large valuable tufa boulders and fewer small stones elsewhere. Adding bridging stones instead of removing contact material can be easier and can involve less risk of damage to large stones.
The incomplete north face opening reminded me of the bronze sculpture “Sphere Within a Sphere” that Mary and I had seen years before at the Vatican, so the design changed. I decided the north face would appear to have been sheared off, creating a shady hollow in the roundish lower boulder
The space between the east and west slabs at the north face was roughly triangular, so as I raised a piece of tufa up within the space, it made contact with both walls. With minimal shaping of the inside walls of the east and west slabs, I was able to make notches that would lock horizontal pieces of tufa into the structure and create many planting pockets. I started at the top of the gap and worked down so that when done, all the stones were self-supporting and locked in place. I left an opening at the top and rammed soil with a board between the slabs to avoid future settling.
For the upper boulder, I welded a ¾ inch (2 cm) floor flange to the top of the four-inch (10 cm) pipe and screwed in an eight-inch (20 cm) long steel ¾ inch (2 cm) pipe. The boulder’s weight is supported by the flat part of the flange and the pipe holds it upright. I wanted to hide the flange inside the stone, so I needed to cut a shallow 4.5 inch (11 cm) hole ¾ inch (2 cm) deep at the balance point on the bottom of the boulder. I was skeptical but tried a Harbor Freight carbide tip adjustable circle cutter. I thought its two cutters would whack into the irregular tufa and fly apart. But tufa is amazingly soft and machinable and it worked perfectly as I very slowly fed the cutter into the stone. I used a 4.5 inch (11 cm) angle grinder to remove the center disk left by the cutter. I then drilled a quarter-inch (6 mm) hole for an irrigation line from the cutter’s center pilot hole to the top of the boulder and then enlarged the first nine inches (23 cm) of the hole to 7/8 inch (2.2 cm) for the ¾ inch (2 cm) pipe. I lifted the upper boulder up with the tripod, threaded the irrigation line that came up inside the pipe through the boulder, and smoothly slid the boulder down the pipe until it rested on the flange. I was done, except that the boulder freely rotated around the pipe. I selected the best orientation and raised the boulder a few inches so that I could spread epoxy on the flange.
Suddenly, I had a serious problem. The tripod wasn’t exactly centered on the ¾ inch (2 cm) pipe so the boulder clamped on it and broke the steel pipe where it threaded into the flange. The broken pipe was at an angle and hanging together by a thin shred of steel. If I winched the tufa higher and broke the shred, I’d be unable to remove the threaded end of the pipe with a screw extractor because an irrigation tube ran through the flange. If I pushed the tube out of the way, I might not be able to retrieve it from the bowels of the four-inch (10 cm) pipe. Moving rock is like chess – you have to look several steps ahead. I decided to do something that you should never do: get directly underneath a suspended boulder and push it with my shoulder to counteract the clamping action while pushing the winch’s up button. Luckily, it worked and the tufa rose out of the way without breaking off the pipe. I gingerly used the long piece of the pipe as a handle to unscrew the threaded piece in the flange. I replaced the ¾ inch pipe, placed epoxy on the flange, and smoothly slid the boulder down the new pipe. The tufa tower was finished in the spring of 2020.
While the tufa tower is in full sun, the lower boulder’s tufa slabs came from a shady garden where they were horizontal and growing many plants, including hundreds of Erinus alpinus. I thought the Erinus would die back on the sunny south and west sides, but it didn’t. A Saxifraga oppositifolia on the east side and a rockcress on the south side grew faster. A maidenhair spleenwort in the hollowed-out north side grew from one to four inches (2.5 to 10 cm) in diameter. Planted in soil pockets in the north side’s hollow are Hosta ‘Pandora’s Box’, several Ramonda myconi, Primula allionii ‘Lismore Treasure’, plus others. Major new plants in soil at the top of the lower boulder are Salix arctica var. petraea and Daphne cneorum var. pygmaea. The upper boulder is pure tufa with 21 new, mostly xeriscape, plants such as Echinocereus triglochidiatus, Coryphantha vivipara (syn. Escobaria vivipara), and Jovibarba heuffelianus ‘Steffan’ planted in it. I also planted some porophyllum saxifrage cuttings on the north side. I misted them nearly every day during last summer’s drought and kept them alive, but they’ll probably die when I cut back on watering next summer. I expect that we’ll settle on watering the tower every three or four days during the summer. I’m looking forward to experimenting with the many different exposures, micro-climates, and the rain shadow on the tower.
I hope this article encourages NARGS members to tool-up and explore new ways to use tufa in their gardens. At the same time, it’s important to note that you can build wonderful tufa gardens without shaping and tools, and so I also hope this article doesn’t dissuade tool-phobic readers from using tufa.


 angle grinder (top left), tufa with parallel cuts ready to be snapped off with a screwdriver (top right), and a masonry drill bit (bottom).")


 pipe, the two irrigation tubes beside the pipe, and the mortar between south and west slabs at the upper left.")
