Our alpine team at RHS (Royal Horticultural Society) Garden Wisley in Surrey, United Kingdom, looks after a large Rock Garden, Landscape House and Crevice Garden, each with permanent planting schemes to maintain. But we also provide year-round color in our Display House showing off plants from the collections of 6000 pots we care for behind the scenes.
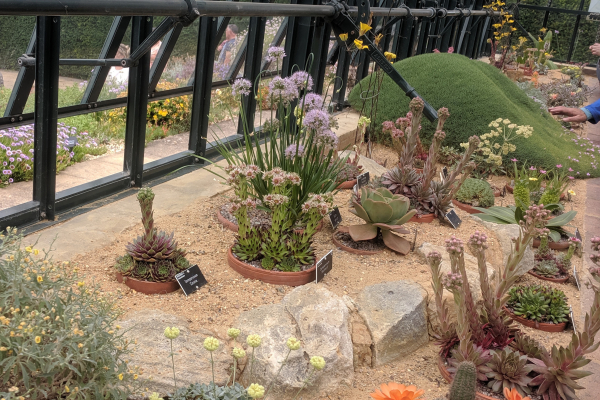
Most of these container-grown plants are in terracotta pots, which look good on display and are porous to air and water. These are plunged into raised sand beds which have been built within glasshouses so we can control ventilation and watering year-round.
In winter or dormant periods, we keep our plunges dry. Containers have a perched water table, the volume of soil which will always be moist in the bottom of any pot. The plunge mitigates this effect, acting as a kind of sponge, aiding drainage by providing a continuous movement of water down through the pot so the roots don’t sit wet. The sand also buffers extreme temperatures and keeps roots from freezing.
In hot weather, the sand around the pots is kept moist, providing a cool root environment. At times when many alpines are in a slower growth rate (between the natural spring and autumn rains, for example), this means we don’t need to water heavily directly into the pot and risk over watering. However, the terracotta’s porosity allows some water movement back into the pots, helping to prevent complete desiccation. Roots can use the water in the sand below as an extension of their compost. In a busy department with unpredictable weather, this type of buffer is essential!
Unfortunately, the main disadvantages with sand plunges come from mistakes made when trying to balance the two advantages above. For example, if the plunge is too wet, or too shallow, plants won’t drain well and there is a risk of rot. If the plunge dries out in summer it won’t provide our ideal root environment and the pots dry out as quickly as if they were not plunged at all. Generally, in summer I water the plunge well twice a week and the pots once to twice weekly depending on the genera.
In our cushion house, I repot most of our plants annually. This allows me to assess any root problems that might be affecting the collection, and add any additives to the soil that might have fallen to low levels in the previous year. Additionally, leaving the pot in the sand for any number of years, unmoved, would allow the roots to grow too deeply into the plunge. Long, deep alpine roots often resent disturbance, and as we are growing primarily for display, we need to be able to move plants without the risk of ripping roots and losing plants even if that plant has not been displayed for a year. It does mean plants are kept smaller than if planted out, but it does save staff trying to lift very heavy pots, too.
Sand choice is very important. Coarse sand is our choice, which drains efficiently with smaller pores than most compost that your plants will be growing in. Water would not move as easily through a pot to a larger pored medium, as the adhesive tension between water particles will be stronger than the gravity pushing it downwards into the air spaces.
It’s worth experimenting with sand before buying, as some fine sand can be oddly hydrophobic. Water pooling on the surface or running to the lowest level if your plunge isn’t flat can leads to very uneven moisture levels. I think this is due to a higher silica content than coarse sand which is calcium carbonate based.
Although I have heard of people using ash, bark or other additives in a plunge, I would only ever use clean coarse sand, which will reduce pest, disease, and weed outbreaks. Moreover, I often find that many of the harder alpines we grow self-seed and germinate in the plunges more readily than they do when sown into seed compost, even with the help of my loving stares! I believe this to be the result of using such a sterile medium and is a reminder of the success and popularity of sand beds. Plunges are beds for pots providing the same benefits.
Basic construction advice follows, but I am especially keen to emphasize the importance of the gardener’s comfort. As a lot of my time is spent plunging (see rules below), picking over, watering, seed collecting, height is a very important consideration to prevent a bad back. This also applies for the width. How far can you reach? You do not want to overstretch your back lifting heavy pots away from you.
We have two methods of building plunges. One is a raised wooden bench (I have seen some homemade ones using old doors), with sides deep enough to hold our deepest pot with at least 6 inches (15 cm) of sand below. Sufficient depth is important, as the deeper the sand, the further away the water table will be from your pot. Line the bottom with polythene or horticultural permeable liner (usually sold as landscape fabric in the U.S.) and drill drainage holes through the wood and liner. Untreated wood will rot fairly quickly, and be sure it is strong enough to hold the weight of wet sand.
By far our best sand plunges are made from four courses of cement blocks cemented together like a raised bed, half of the base filled with rubble, (as this is cheaper than filling entirely with sand) and the same sufficiently deep layer of sand on top.
When plunging your pots, some rules apply. You want to plunge to about 1 inch (3cm) from the pot’s top. This ensures enough grip to lift it easily, and that water doesn’t enter the pot when you damp the plunge.
Really good contact must be made between the pot and the sand. A good practice is to mound the sand slightly where it will contact the pot’s hole. Push the sand down around the sides of the pot, otherwise, the sand will sink when you water and you’ll be left with gaps from which no benefit can be gained. Having a level sand plunge makes life much easier and aesthetically pleasing.
With the number and range of plants we grow, using sand plunges helps enormously to regulate watering and keep a sterile environment between the pots. Some pests, such as nematodes, will still be able to move through a collection via the water, but these are rare. In a smaller collection where there is more diversity plunged together, you may find a large plunge unsuitable for growing plants together. For example, saxifrages next to dionysias will have very different soil saturation needs. Building smaller plunges, separating areas or experimenting with tubs could be options here for very small pots, but you do need to ensure the sand is deep enough below the pots.
Finally, there is no need to plunge plants into a sand bed, unless you want to move them again soon. A plant in a pot plunged in sand is a plant restricted unnecessarily. Growing in plunges is suited to plants for display or which you move every year. It may be advantageous to permanently plunge a potted alpine if you didn’t want to risk disturbing an established or delicate root system or if a plant was too large to continue moving. This is not something we have done here consciously. However, there is always an exception. A marvelous Dianthus anatolicus, put in the Display House long ago, has long since grown out of the bounds of its pot and maneuverability!
